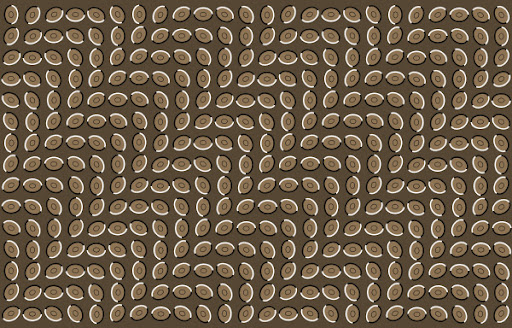
Ever notice how sometimes images can play tricks on you? In today’s tutorial I will demonstrate how to create an optical illusion that appears to move, even though in reality, it is standing still. Let’s get started!
Tutorial Details
Program: Adobe Photoshop CS3
Difficulty: Beginner
Estimated Completion Time: 1 Hour
Step 1
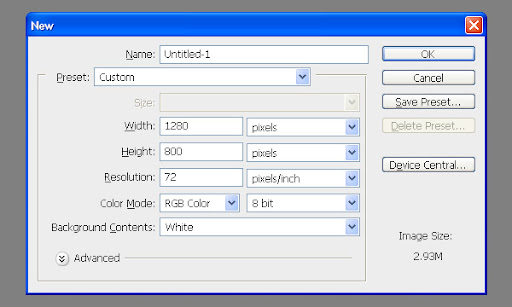
Create a new document with dimensions set to 1280px by 800px.
 Step 2
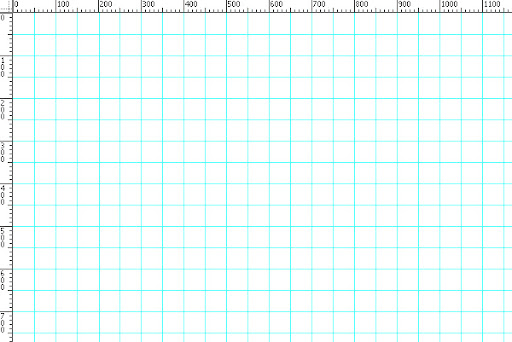
Hit CMD + R to enable rulers if you don’t have them turned on by default. Make sure they are displaying pixels. Create a new guideline every 50 pixels both vertically and horizontally. You can create them by going to View > New Guide or by clicking on a ruler and by dragging it onto the canvas. If you prefer to use a dialog box then you’ll have to turn it on several times and simply type in values starting from 50px to 1250px in case of vertical guidelines and 50px to 750px in case of horizontal guidelines.
Tutorial Details
Program: Adobe Photoshop CS3
Difficulty: Beginner
Estimated Completion Time: 1 Hour
Step 1
Create a new document with dimensions set to 1280px by 800px.

Hit CMD + R to enable rulers if you don’t have them turned on by default. Make sure they are displaying pixels. Create a new guideline every 50 pixels both vertically and horizontally. You can create them by going to View > New Guide or by clicking on a ruler and by dragging it onto the canvas. If you prefer to use a dialog box then you’ll have to turn it on several times and simply type in values starting from 50px to 1250px in case of vertical guidelines and 50px to 750px in case of horizontal guidelines.

Step 3
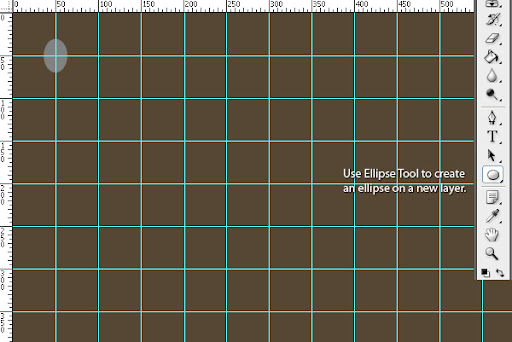
Fill the background layer with #564734 using the Paint Bucket Tool (G). Grab an Ellipse Tool (U) and create an ellipse on a new layer (hit CMD + Shift + N and Enter to create a new layer). My ellipse has 46px by 34px including a 3px black and white border. So, I’d recommend something that has between 43px by 31px at first but it doesn’t have to have exactly these dimensions. Its dimensions don’t make a huge difference but your ellipses have to be placed close together. Large gaps will produce poor results.
 Step 4
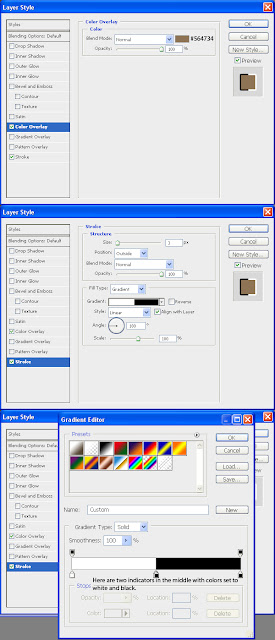
Double-click on the thumbnail of your layer with ellipse and apply the following style. Turn on Stroke. Change Fill Type from Color to Gradient. Change Angle from 90 degrees to 180 degrees. Click on the gradient bar and anew window should pop up. Create two additional indicators in the middle of the bar. Set first two indicators to white (#ffffff) and the last ones to black (#000000). Also enable Color Overlay and change its color to #564734 for instance.
 note: the above image size is not so big so please Download it to view it clearly
Fill the background layer with #564734 using the Paint Bucket Tool (G). Grab an Ellipse Tool (U) and create an ellipse on a new layer (hit CMD + Shift + N and Enter to create a new layer). My ellipse has 46px by 34px including a 3px black and white border. So, I’d recommend something that has between 43px by 31px at first but it doesn’t have to have exactly these dimensions. Its dimensions don’t make a huge difference but your ellipses have to be placed close together. Large gaps will produce poor results.

Double-click on the thumbnail of your layer with ellipse and apply the following style. Turn on Stroke. Change Fill Type from Color to Gradient. Change Angle from 90 degrees to 180 degrees. Click on the gradient bar and anew window should pop up. Create two additional indicators in the middle of the bar. Set first two indicators to white (#ffffff) and the last ones to black (#000000). Also enable Color Overlay and change its color to #564734 for instance.

Step 5
Now grab the Ellipse Tool (U) again and create a new layer above your previous layer (hit CMD + Shift + N and Enter). Draw a smaller ellipse inside your last one. Its size is up to you. Just make sure everything looks like on the image below.
 Step 6
Group these two layers by selecting them and hitting CMD + G. Right-click on the group and choose Merge Group.
 Step 7
Move your first layer there where the two guidelines cross in the top left corner as shown below.
Now grab the Ellipse Tool (U) again and create a new layer above your previous layer (hit CMD + Shift + N and Enter). Draw a smaller ellipse inside your last one. Its size is up to you. Just make sure everything looks like on the image below.

Group these two layers by selecting them and hitting CMD + G. Right-click on the group and choose Merge Group.

Move your first layer there where the two guidelines cross in the top left corner as shown below.
Step 8
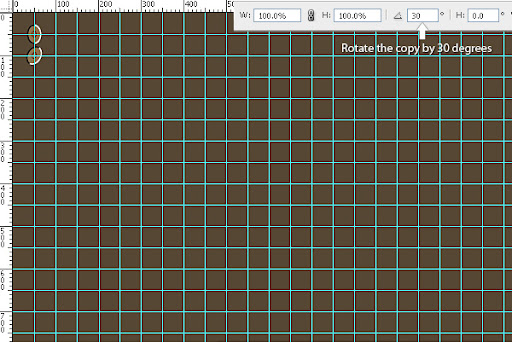
Hit CMD + J or go to Layer > Duplicate Layer in order to duplicate this layer. Place the copy right below your first layer. Once it’s exactly in the middle of the two crossing guidelines hit CMD + T. Rotate the copy by 30 degrees. You can do that in the top toolbar (see the screenshot below).
 Step 9
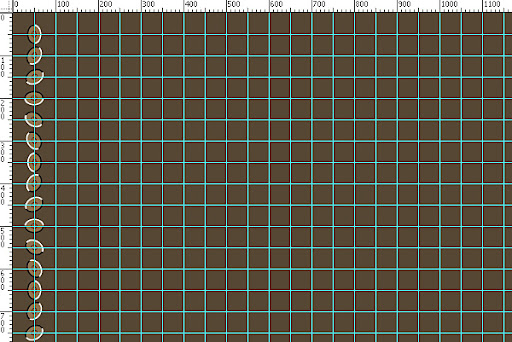
Keep copying THE FIRST ellipse and rotate each copy by multiples of 30 degrees. Place each copy on top of everything else (that’s also very important). Once you get to 180 degrees you won’t be able to type in 210 degrees so just use negative values. So, third copy would have 60 degrees, fourth 90 degrees, seventh 180 degrees, eighth -150 degrees and so on. Once you are done you should have 15 copies in total. Select each copy by selecting the first one in layers’ palette, holding Shift key and selecting the last one. All the copies in between should have become selected. Hit CMD + G to group them.
Hit CMD + J or go to Layer > Duplicate Layer in order to duplicate this layer. Place the copy right below your first layer. Once it’s exactly in the middle of the two crossing guidelines hit CMD + T. Rotate the copy by 30 degrees. You can do that in the top toolbar (see the screenshot below).

Keep copying THE FIRST ellipse and rotate each copy by multiples of 30 degrees. Place each copy on top of everything else (that’s also very important). Once you get to 180 degrees you won’t be able to type in 210 degrees so just use negative values. So, third copy would have 60 degrees, fourth 90 degrees, seventh 180 degrees, eighth -150 degrees and so on. Once you are done you should have 15 copies in total. Select each copy by selecting the first one in layers’ palette, holding Shift key and selecting the last one. All the copies in between should have become selected. Hit CMD + G to group them.

Step 10
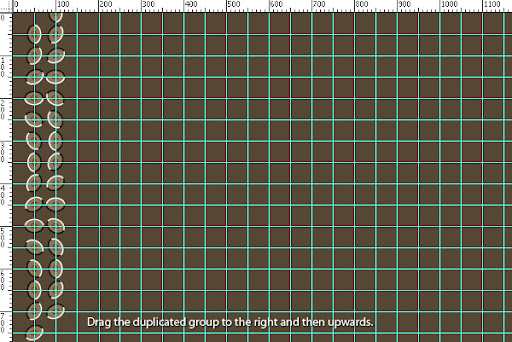
Go to Layer > Duplicate Group and duplicate it. Select your Move Tool (V) and drag this group like one the image below.
 Step 11
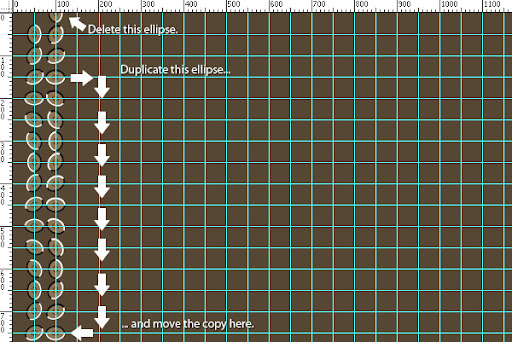
Open up your newly created copy of the group and remove the very bottom layer (which should be your very top ellipse). Then duplicate the third layer counting from bottom of this group which should be your third layer counting from top of the ellipses. If you’re unsure which layers should be removed and which moved then take a look at the image below.
 Step 12
Repeat the 11th step several times until you get the final image.

Go to Layer > Duplicate Group and duplicate it. Select your Move Tool (V) and drag this group like one the image below.

Open up your newly created copy of the group and remove the very bottom layer (which should be your very top ellipse). Then duplicate the third layer counting from bottom of this group which should be your third layer counting from top of the ellipses. If you’re unsure which layers should be removed and which moved then take a look at the image below.

Repeat the 11th step several times until you get the final image.

When Does This Effect Work?
This effect will work in several instances.
1.You can use many different shapes to achieve the same effect. Circles and ellipses seem to work the best but rectangles or squares would do the trick as well
.
2.Each shape should be lighter on one side and darker on the other. This could be a black and white border like in my case or just a gradient with any color as long as there is a visible contrast between them.
3.You can put something inside the shape to make it more detailed.
Your image should consist of many similar shapes and each one has to be really close to one another.
4.Your image should be large enough so that it makes your eyes constantly move.
5.You can create just about any pattern from these circles or ellipses.
6.You should rotate your shapes step by step so that their darker sides (black in my case) are right next to the lighter ones (white in my case). It is very good idea to rotate each circle a bit (like 15 degrees or 30 degrees). If you don’t rotate them it should still work fine but it would ‘move’ vertically or horizontally.
7.Other than that you won’t get this kind of effect or it wouldn’t be as much observable.
How Does This Effect Work?
When we look at the image below, our brain tries to convert it from 2D to 3D. This is because the borders around the ellipses are inconsistent. This confuses us and creates an illusion of movement.
Final Image
Take a look at the final image below.
This effect will work in several instances.
1.You can use many different shapes to achieve the same effect. Circles and ellipses seem to work the best but rectangles or squares would do the trick as well
.
2.Each shape should be lighter on one side and darker on the other. This could be a black and white border like in my case or just a gradient with any color as long as there is a visible contrast between them.
3.You can put something inside the shape to make it more detailed.
Your image should consist of many similar shapes and each one has to be really close to one another.
4.Your image should be large enough so that it makes your eyes constantly move.
5.You can create just about any pattern from these circles or ellipses.
6.You should rotate your shapes step by step so that their darker sides (black in my case) are right next to the lighter ones (white in my case). It is very good idea to rotate each circle a bit (like 15 degrees or 30 degrees). If you don’t rotate them it should still work fine but it would ‘move’ vertically or horizontally.
7.Other than that you won’t get this kind of effect or it wouldn’t be as much observable.
How Does This Effect Work?
When we look at the image below, our brain tries to convert it from 2D to 3D. This is because the borders around the ellipses are inconsistent. This confuses us and creates an illusion of movement.
Final Image
Take a look at the final image below.


